Azure Installation
Included in this page are instructions to setup AuctionWorx Enterprise on Azure.
This document will describe the necessary steps to successfully deploy an instance of AWE on Azure using:
- Microsoft Visual Studio 2015 Express
- Microsoft SQL Server Management Studio 2014 Express
- Microsoft Azure account
- A free account with SendGrid.com
A crucial piece to making this all run smoothly is to take careful notes of the Usernames, Passwords, IP Addresses, Database Names and anything else that could be important as you go. There will be many references to information added in previous steps.
Major Steps in this Process:
- Create a Database Server on Azure
- Create the Database in SQL Server Management Studio
- Setup the SMTP Service with SendGrid.com
- Open the project in Visual Studio
- Edit the Web.Config File in Visual Studio
- Using Visual Studio to Publish the Web App to Azure
- Using Blob Storage for Media Storage
- Testing your Deployment
Create a Database Server on Azure
Note: The new asynchronous bidding system and SignalR updates in v3.0 currently rely on SQL Service Broker which is not available with SQL Azure. Since the initial release of v3.0 does not support SQL Azure, we are providing steps to get up and running with a SQL Server VM on Azure.
Microsoft Azure offers preconfigured SQL Server Virtual Machines (VM) that support the technologies required by AuctionWorx. These instructions will help with getting the software running on Azure for development purposes but, the size and scope of the options chosen here will need to be revisited when the site is ready to be deployed on a custom domain as a production site. One of the advantages of using Azure is that they offer the ability to scale as required. Most if not all of the configuration options chosen can be re-factored when the site is ready to go live.
Note: Having a naming convention is an important aspect to this setup. Throughout this document, you will see the use of an example Username or an example Resource Group name that all contain a unique theme. You can read more about how Microsoft recommends a custom naming convention but in short, you should plan on having a recognizable and unique string of characters that you can use when asked. (Ex, "RWexample1" or "TestAuctionSite")
Note: There will be many usernames, passwords, port numbers and IP addresses that will need to be entered and re-entered throughout this process. It is highly recommended to keep notes of all the information that is used in this section.
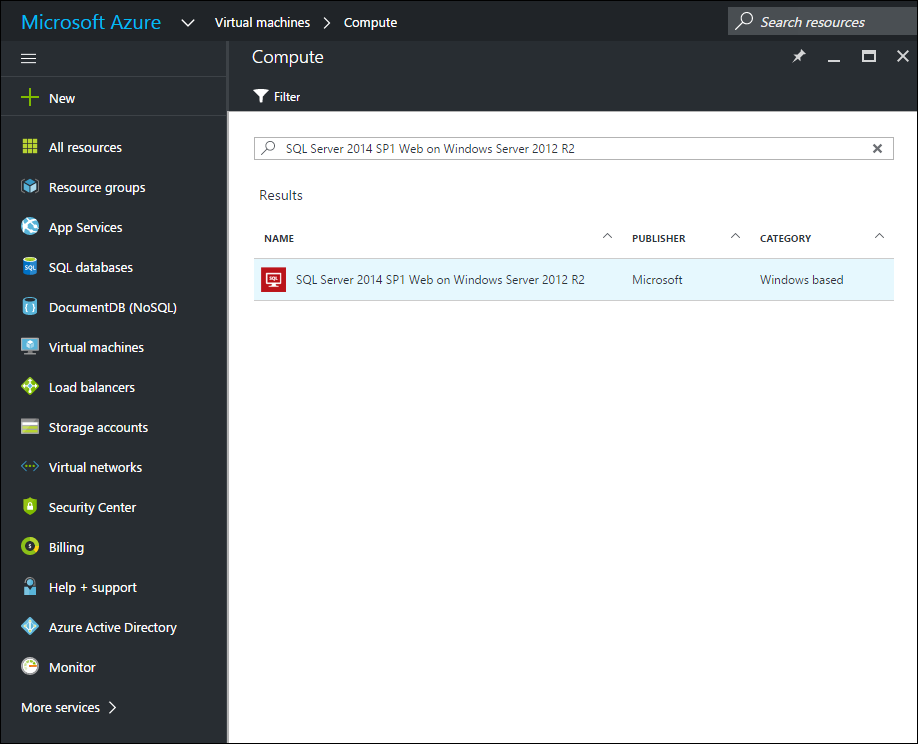
- After logging into the Microsoft Azure portal at https://portal.azure.com, select Virtual Machines from the navigation on the left and then click the "+ Add" button at the top.
- Using the search bar below the Filter button, type in "SQL Server 2014 SP1 Web on Windows Server 2012 R2" and press enter.
- When you select this server type, you will given a drop down menu to choose your deployment model. Select Resource Manager and click Create.
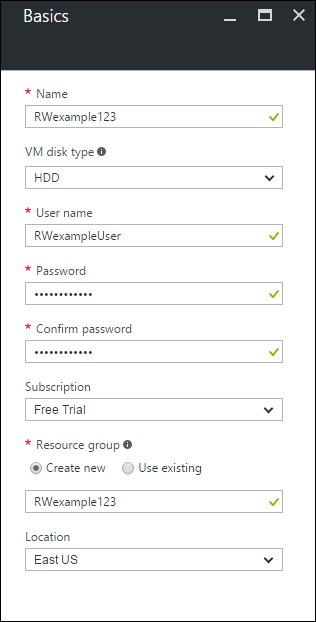
- Basics - Fill in this form with the following values and click OK.
- Name - "RWexample1..."
- VM disk type - HDD
- User name - "RWexample1..."
- Password - Enter something that fits the parameters required. It should not contain the username in it.
- Subscription - Free
- Resource Group - Select "Create New" and enter "RWexample1..."
- Location - East US or whatever location is closest to the users that will view your site.
- Size - Choose A2 Basic
- Settings - There is no reason to change any default settings. Just click OK.
- SQL Server Settings - Fill in this form with the following values and click OK.
- SQL connectivity - Public (internet)
- Port - 1433
- SQL Authentication - Enable
- Login name - Use the same username for both the machine settings and the SQL Server settings
- Password - Use the same password.
-
Summary - Take a screenshot of the summary and click OK.
At this point you have created the virtual machine that will host the database that AuctionWorx requires to run. Deploying this VM will take several minutes to complete. Wait for this to finish before moving on to the next step.
Create the Database in SQL Server Management Studio
This part of the process will require downloading and installing SQL Server Management Studio. The latest version of this program will work with any SQL Server.
- Now that the VM has been deployed, you can view the details of this machine. Close any open windows in the Azure Portal to view the Dashboard.
- Select "Virtual Machines" from the navigation on the left and then click on your VM in the list. Alternatively you can select your VM from the new icon on the Dashboard. Once open, use the "Overview" to see the Public IP address. Copy this down for your notes.
- Open SQL Server Management Studio. When you open SQL Server Management Studio (SSMS) you will be greeted by a dialogue box asking for credentials to connect to a database server.
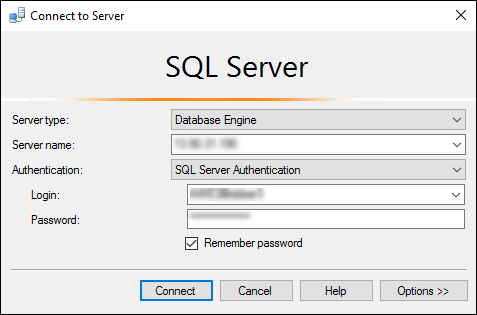
- Connect to Server - Fill in the credentials as follows to connect.
- Server type - Database Engine
- Server name - Enter the IP address that was shown in the Overview of the VM
- Authentication - SQL Server Authentication
- Login - Enter the Login Name used on step 7 (SQL Server Settings) above
- Password - Enter the Password used on step 7 (SQL Server Settings) above
Click connect.
- In the frame to the left, you will see your server listed. Below that server you should see a folder called "Databases". Right click the Databases folder and click "New Database..."
- Enter a meaningful name for your database like "RWexample1" and click OK.

- In a text editor, open the AuctionWorx.SQL file that came in the download package from RainWorx. It can be found in the "SQL" folder. Select all of the contents and copy it.
- Go back to SQL Server Management Studio and while the new database is selected, click on File > New > Query with Current Connection. Paste the contents of the AuctionWorx.SQL file in and click on Execute from the tool bar (or press F5) to run the script.
- Once that process has finished (should take about 2 minutes) your database is ready to be connected to the web app.
Setup the SMTP Service with SendGrid.com
RainWorx recommends using the service SendGrid.com to new clients that are unsure what SMTP (Simple Mail Transfer Protocol) service to use. SendGrid.com provides a free option for those who are just getting started and are unsure how what level of service will be required.
If you have a different exchange service that can provide you with SMTP settings you can skip this step.
- Go to SendGrid.com.
- Click the Try for Free button.
- Create a new account with the Free 12k $0.00 / mo option.
- Verify your email address.
- Wait for the provisioning process to be completed. This should take 1 or 2 minutes.
- Once provisioning has been completed (You should receive an email saying it has) you can create an API Key. Reload the SendGrid.com page.
- Click Settings > API Keys then click the Create API Key. Choose a General Key.
- Fill out the form. Choose a General Key and give it full permissions for all of the settings.
- Copy the API Key and paste it into your notes.
The API Key is used as the Password for the SMTP settings. Host, Username and Port should be the same for anyone using SendGrid.com with AuctionWorx. Your Settings will look something like this:
Host - smtp.sendgrid.net
Username - apikey
Password - SG.Yk6bdk85RMqXRi543zI4gQ.cFpr3zLPnIQTviWN4uYgusoLvdliq3XY8g...
Port - 587
Open the project in Visual Studio
This part of the process will require downloading and installing Microsoft Visual Studio 2015.
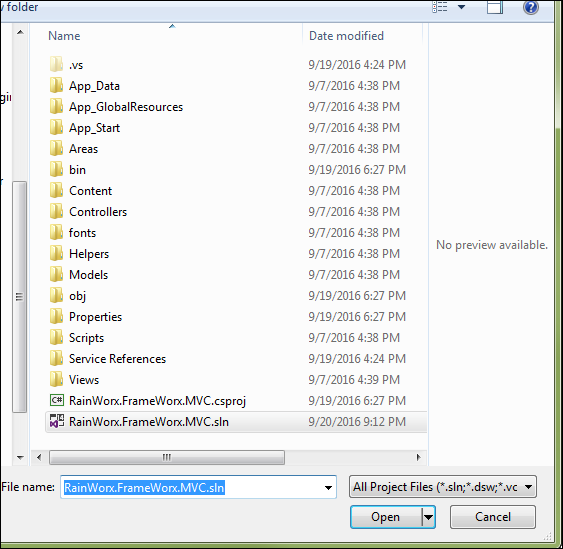
- In Visual Studio 2015, open the AuctionWorx solution. Click on File > Open > Project, select the folder that contains the project and open the RainWorx.FrameWorx.MVC.sln file.
Edit the Web.Config File in Visual Studio
This section of the process is where the SMTP settings, Database Connection settings and the License Key are installed into the project to make it publishable.
-
Open the web.config file from the Solution Explorer and use the find feature (Ctrl + F) to find "connectionStrings".
- Fill in the information using the information that you have saved from creating the database server and database.
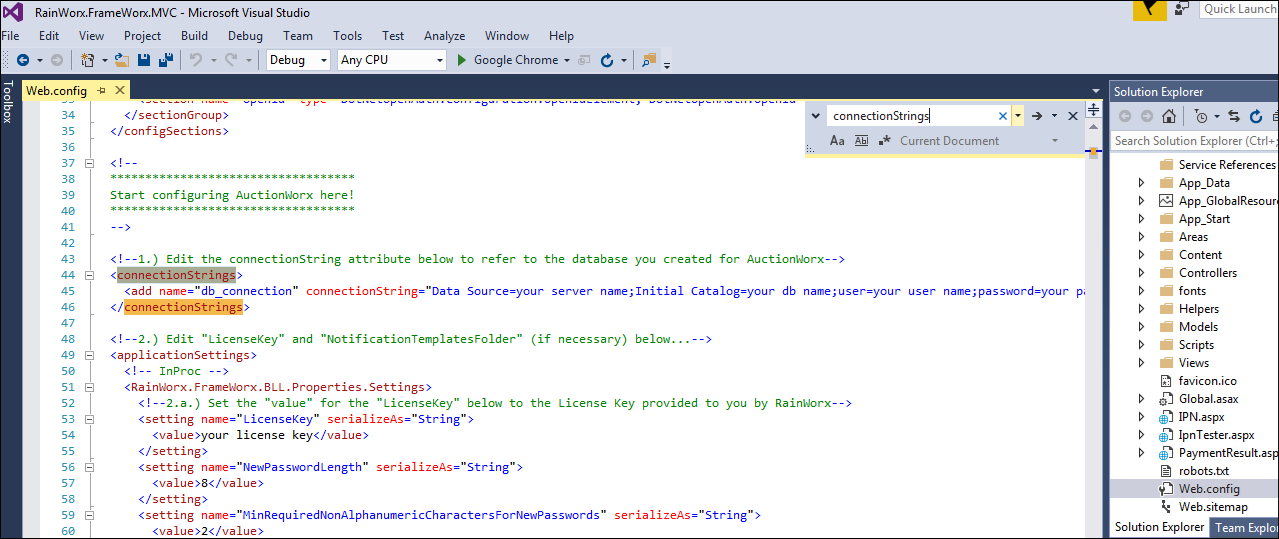
Note: Change the following sections of code on this line to match the information that applies to your setup:
Data Source=Your SQL Server IP Address;
Initial Catalog=Your Database Name;
user=Your SQL Server Username;
password=Your SQL Server Password;
These settings are the same ones used to connect to SQL Server Management Studio.
Note: Be sure that only the characters that are in each of these data fields are used after the equal sign and that there are no spaces before the semicolon.
- Use the find feature (Ctrl + F) to find "SMTP".
- Enter the settings that you recorded earlier from doing the SendGrid.com steps into the quotes after each setting name.

- Use the find feature (Ctrl + F) to find "LicenseKey".
- Inside the "<value>" tag, enter in the License Key that was provided in the purchase confirmation email from RainWorx.

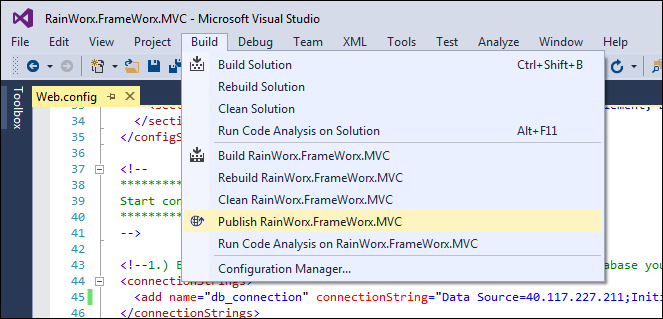
Using Visual Studio to Publish the Web App to Azure
Now that the web.config file contains your License Key, SMTP Settings and Connection Strings, it is finally time to publish your web app to Azure.
- Click Build > Publish RainWorx.FrameWorx.MVC
- On the Publish screen, select Microsoft Azure App Service.
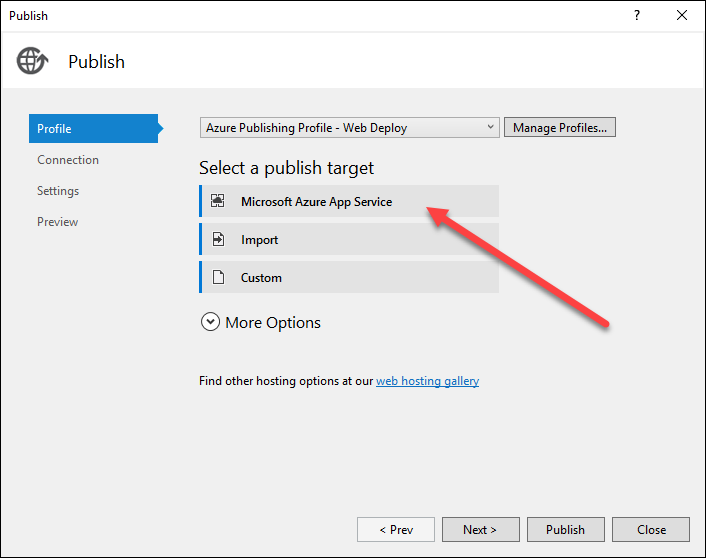
- Add the Azure Account that you built your VM on. Follow the steps as prompted until Visual Studio 2015 is connected to your Azure account.
Note: Microsoft's integration between Visual Studio and Azure is always improving. This process of creating a new web app or web service could (and likely will) become more automatic than is described in this article.
-
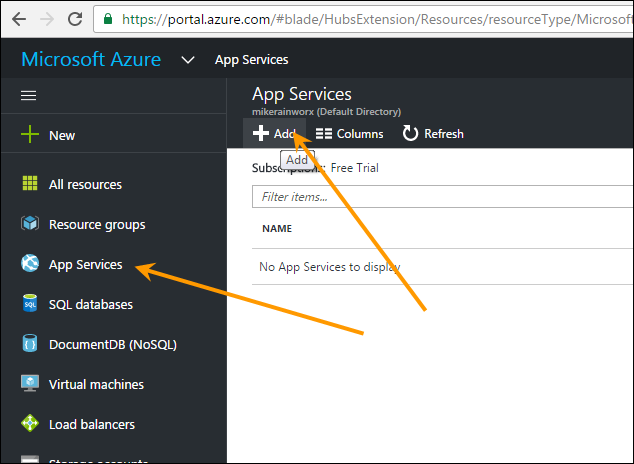
Switch over to the Azure Portal and add a new Web App. Click App Services from the left navigation and click the "+ Add" button.
-
Fill in the form with the following information. I'll put in my information for this example:
App Name - RWexample1
Subscription - Free Trial
Resource Group - RWexample1 (should already exist)
App Service Plan - click Create New and enter "RWexample1" | "US East" | select "B1 Basic"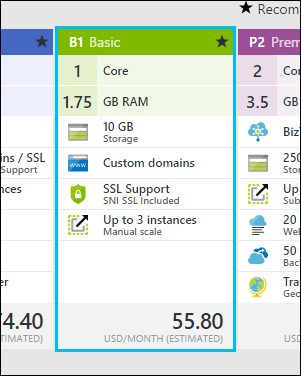
- Click Create.
- Wait for the Web App to deploy on the dashboard.
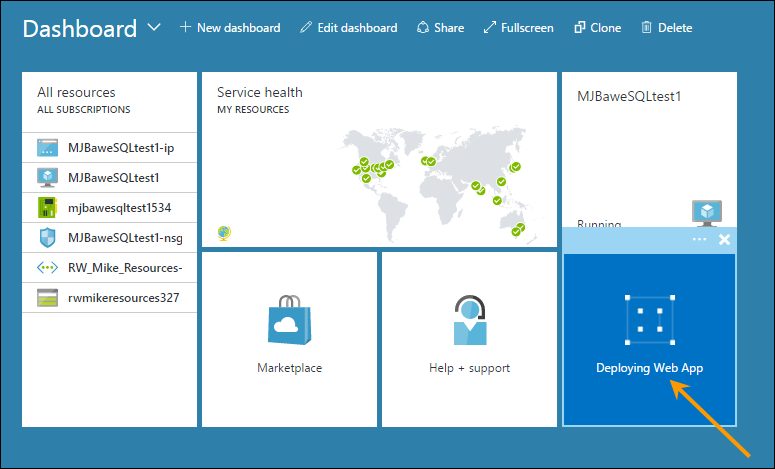
- Once it is finished deploying, open it and take note of the overview.
- Now that the Web App Service has been initiated and Visual Studio has been connected to Azure, Open Visual Studio, Click Build > Publish and select Microsoft Azure Web Apps from the Profile tab.
- Select your Azure account, select Free Trial as the Subscription and there should be an app to select in the Existing Web Apps box. Click OK.
- The next screen showing the Connection tab should be prefilled. You should take note of all the information here.
- Click Publish.
The Publishing process should automatically open the web app upon completion. You are almost done but, It is important to check that all of the services are working correctly.
Using Blob Storage for Media Storage
Note: This process can only be done with AuctionWorx version 3.0.6120 and later. You can check your version by viewing the site and navigating to Admin Control Panel > Advanced > Version.
The following instructions will help you to find the storage account name and key from Azure, plug those values into a connection string, add the connection string and a couple of media provider lines into web.config and run a simple SQL script to change the values on the Admin Control Panel > Advanced > Images page.
Find the Storage Account Name and Key
Creating your new web app in the previous, you will have created two Storage Accounts within the Resource Group as a part of that process. To view the storage accounts that are currently running you need to view them through the Azure Portal.
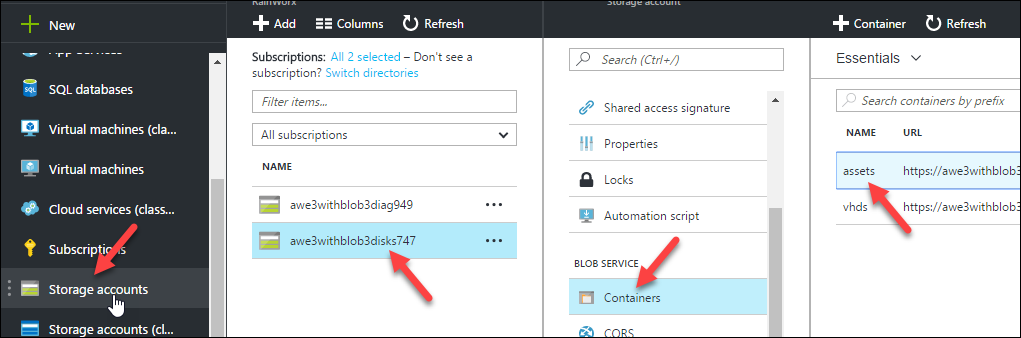
- In the Azure Portal, click Storage Accounts from the left navigation.

- Select the Storage Account with the word "disks" in it.
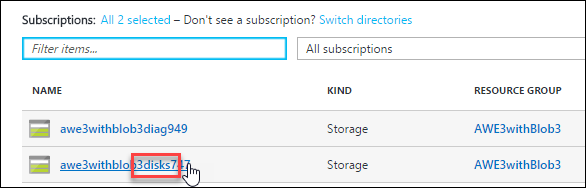
Note: It is not important that Storage account has the word "disks" in it. Any storage account can be use for Blob Storage.
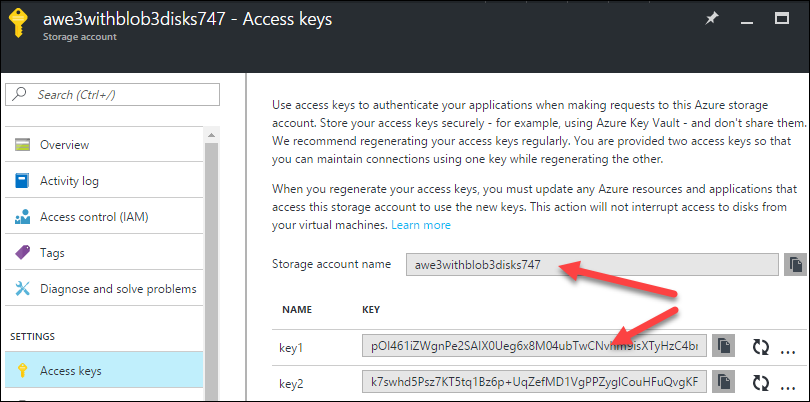
- Click Access Keys under Settings.
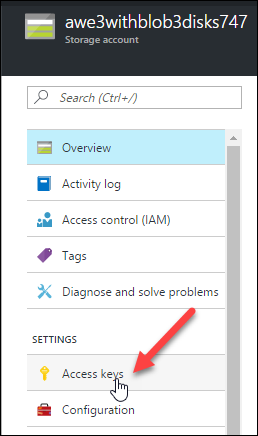
- Copy Key 1 and the Storage Account Name from this final screen.
Adding the Necessary Code to Web.Config
At this stage of the process we need to add a connection string to map to the location of the Blob Storage account and we also need to add a couple of specific providers.
- Open the web.config file in visual studio.
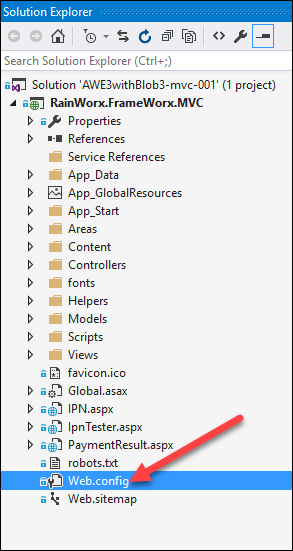
- To find the correct place to add the connection string, press Ctrl + F and type in "connectionString". Add this line right below the connection string that points to the main database:
<add name="azure_blob_storage" connectionString="DefaultEndpointsProtocol=https;AccountName=YOURACCOUNTNAME;AccountKey=YOURACCOUNTKEY"/>
Note: The connection string includes a value called "DefaultEndpointsProtocol" and it should be set to "https".
- Replace the YOURACCOUNTNAME and YOURACCOUNTKEY with the values you have from the previous section, Find the Storage Account Name and Key.
- Once the Connection String is entered, press Ctrl + F and type in "End Media Asset Providers".
- Add the following snippet of code above the "End Media Asset Providers" comment to call the necessary Media Asset Providers:
<!-- Azure Media Asset Providers -->
<type type="RainWorx.FrameWorx.Providers.MediaSaver.IMediaSaver, RainWorx.FrameWorx.Providers.MediaSaver" mapTo="RainWorx.FrameWorx.Providers.Media.Azure.BlobStorageMediaSaver, RainWorx.FrameWorx.Providers.Media.Azure" name="BlobStorage">
<lifetime type="singleton" />
</type>
<type type="RainWorx.FrameWorx.Providers.MediaLoader.IMediaLoader, RainWorx.FrameWorx.Providers.MediaLoader" mapTo="RainWorx.FrameWorx.Providers.Media.Azure.BlobStorageMediaLoader, RainWorx.FrameWorx.Providers.Media.Azure" name="BlobStorageURI">
<lifetime type="singleton" />
</type>
<!-- End Azure Media Asset Providers -->
It should look something like this when done.
- Save the file.
Running the SQL to Apply Necessary Changes
This process will enter the location of the Blob Storage in all of the necessary fields in the Admin Control Panel > Advanced > Images area. The SQL script will fill in all of the values so there is less chance to enter a typo.
- Log into the SQL Server Management Studio and Connect to the Database that you have already setup.
- With the database selected press Ctrl + N or File > New > Query with Current Connection to start a new Query.
- Enter the following into the new query:
update RWX_Attributes set Value = 'BlobStorage' where Value in ('DirectFileSystem', 'DateHashedFileSystem')update RWX_Attributes set Value = 'BlobStorageURI' where Value in ('DirectURI', 'DateHashedURI')
- With the text entered and the database selected, click the Execute button.

Once the query is done executing the job is done. The system should now be storing all of the images on your site in the blob storage area of your Azure account.
Testing your Deployment
- Enter the URL provided by Azure into a browser to view your site.
If your web app now loads you have correctly configured your database connection strings.
- Login in as the admin and change the contact information.
- Navigate to Site Preferences > Contact and change the "Administrator Email" and "System Email Address" to an email address you have access to. Click Save.
- Navigate to Site Preferences > Setup and change "URL" and "Secure URL" to the URL for the site. You can find that in the address bar. Click Save.
- Sign out and create a new user. Click Sign in and on the sign in page, click the "Register Now" link.
- Fill in the form with Test User type information and make sure that the email address is one that you have access to. No harm in using the same email address for all of these steps.
Once you click "Complete Registration", if you see a verification email in your inbox, that means that your SMTP settings are correctly configured.
- Signed in as the admin still click Sell.
- Select a category and Auction and click Next.
- Enter a simple Title, simple Description, a Starting Bid of $100, a Duration of 3 days and click Create Listing.
If you see a Listing Confirmation page that says "Congratulations!" then your license key settings are correctly configured.
- Go back to the verification email in your inbox. Click the link provided to finish the verification process and sign in as the new user.
- Once signed in, locate the listing that the admin user just created. It should be displayed in the category that you listed it under. Open the listing details page.
- Type in a bid of $200.00 and click Submit Bid.
If you see a message that says "You are currently winning this item!" then SignalR and asynchronous bidding are correctly configured.
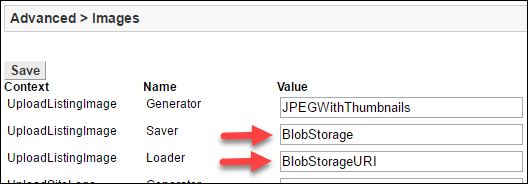
- Navigate to Admin Control Panel > Advanced > Images and check that the UploadListingImage Saver and Loader values contain "BlobStorage" and "BlobStorageURI".
- Go to the Azure Portal and check that your Storage Account has a Container named "assets".
If your Storage Account has a Container named "assets" and the Advanced > Images page has BlobStorage in the various Save and Load fields, you have correctly configured your site to use Blob Storage.