In-Process Installation
Included are instructions to setup AuctionWorx Enterprise on a single web server as a standalone instance.
This document will describe the necessary steps to successfully deploy an instance of AWE on a single server using:
- Windows Server 2016
- Microsoft SQL Server 2016 SP1 Express Edition
- IIS 10
- A free account with SendGrid.com
This step by step guide is designed to cover each of the important steps required to get a web server to run the AuctionWorx software. Ideally AuctionWorx is run in an environment where a separate database server can be used to serve one or multiple web servers with ample resources fitting the expected traffic to the site.
Starting Point
For this guide, the starting point will be a new instance of Windows Server 2016 running on a server with a Quad Core processor and 6 GB of ram. This is not the absolute minimum amount of machine required but, it would not be advisable to go much lower. You can use previous versions of Windows Server to accomplish the same goal, as long as the versions being used are not older than what is described on the System Requirements page.
Major Steps in this Process:
- Setup IIS
- Setup SQL Server
- Install SQL Server Management Studio (SSMS)
- Installing AuctionWorx
- Configuring IIS
- Creating the Database and User
- Configure Connection String
- Setup the SMTP Service with SendGrid.com
- Configuring the SendGrid.com Service in Web.config
- Adding your License Key
- Testing your Deployment
- Beyond the Initial Setup
Setup IIS
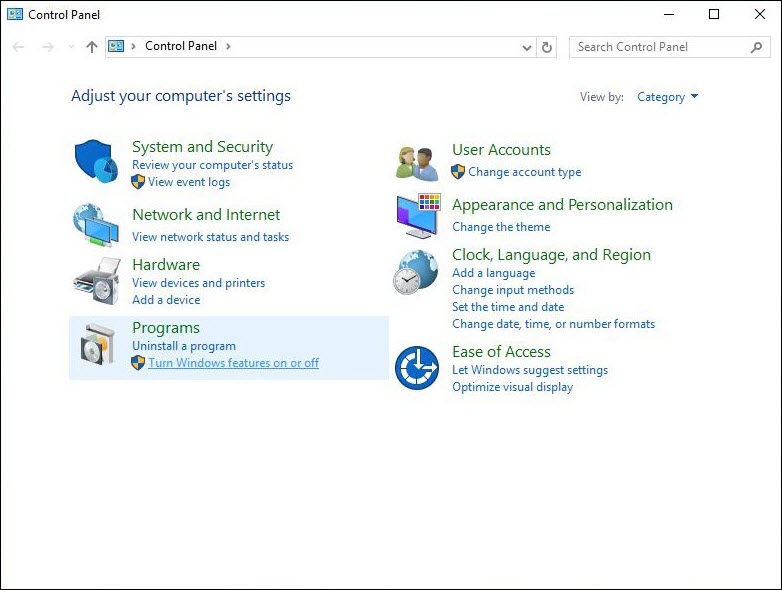
- To setup IIS or Internet Information Services, open the Control Panel and click the "Turn Windows features on or off" option underneath Programs.
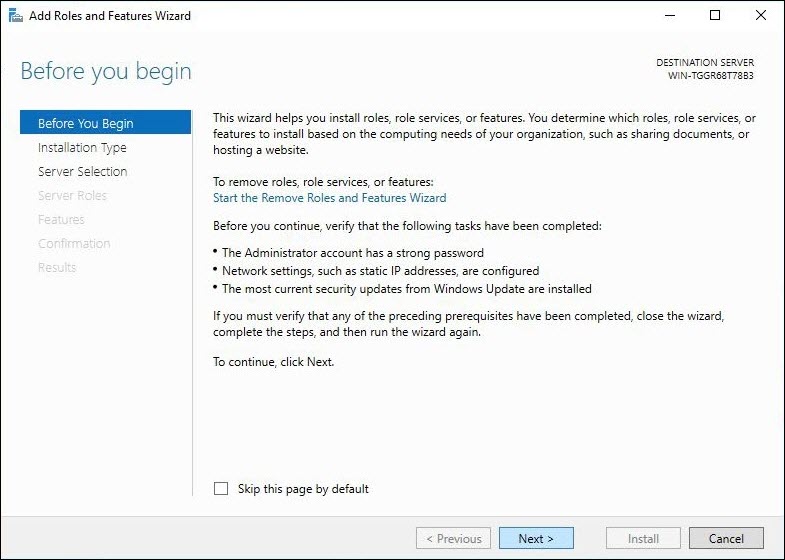
- This will open the Server Manager and the Add Roles and Features Wizard. Click Next.
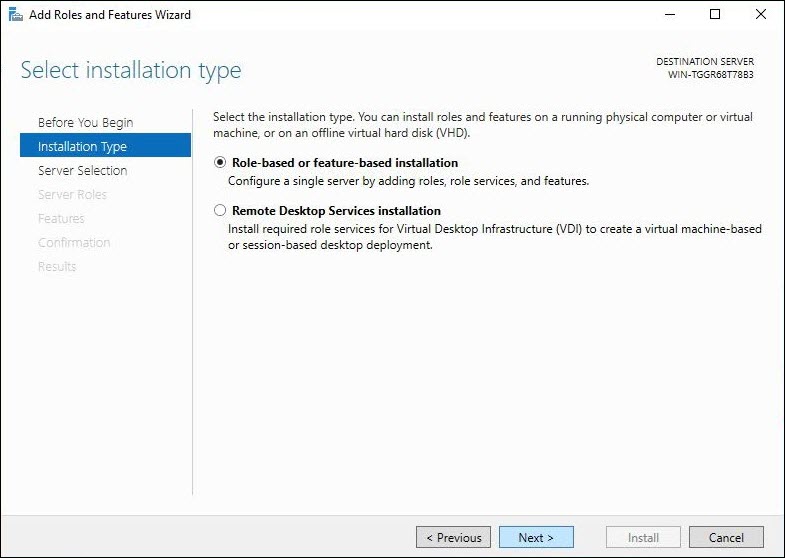
- Select the Role-based or feature-based installation option and click Next.
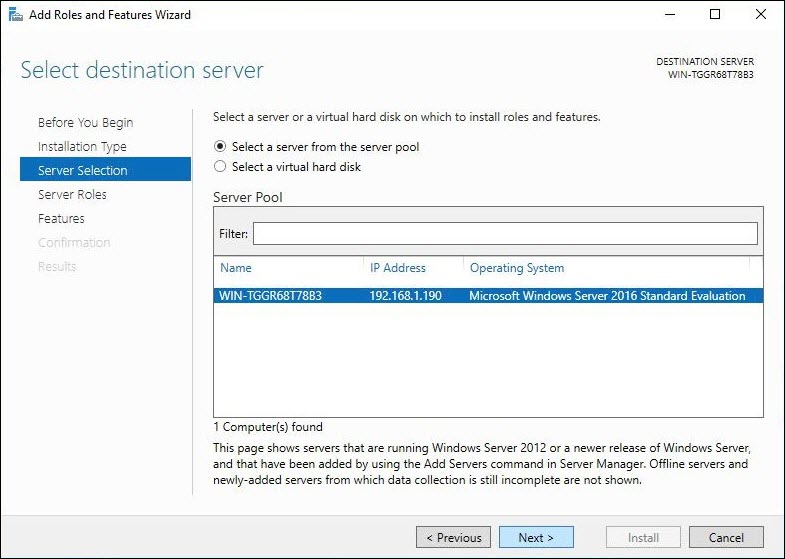
- Select your server from the server pool (it should be the only one) and click Next.
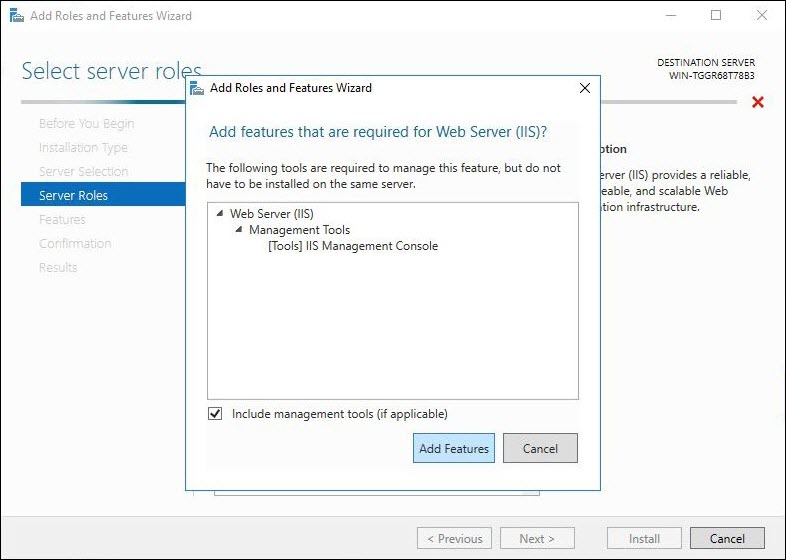
- Include the Web Server (IIS) option. You will be prompted to include the Management Tools and in this case you do want to install these on the server.
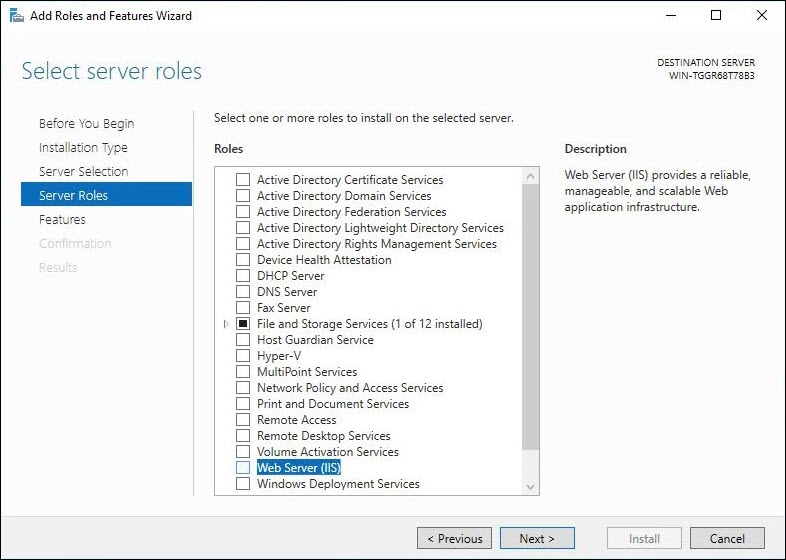
- Click the Add Features button then click the Next button.
- Scroll down the list and add ASP.NET 4.6 and WebSockets Protocol by opening Web Server (IIS) > Web Server > Application Development, then checking both of those features.
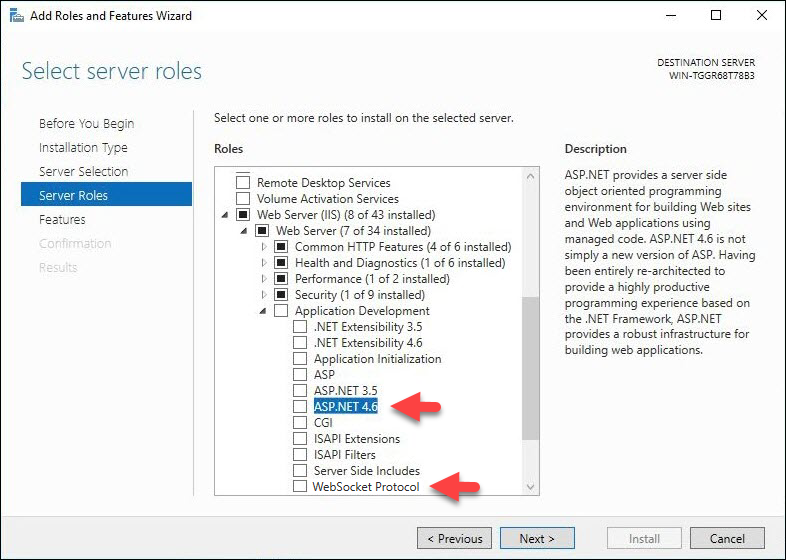
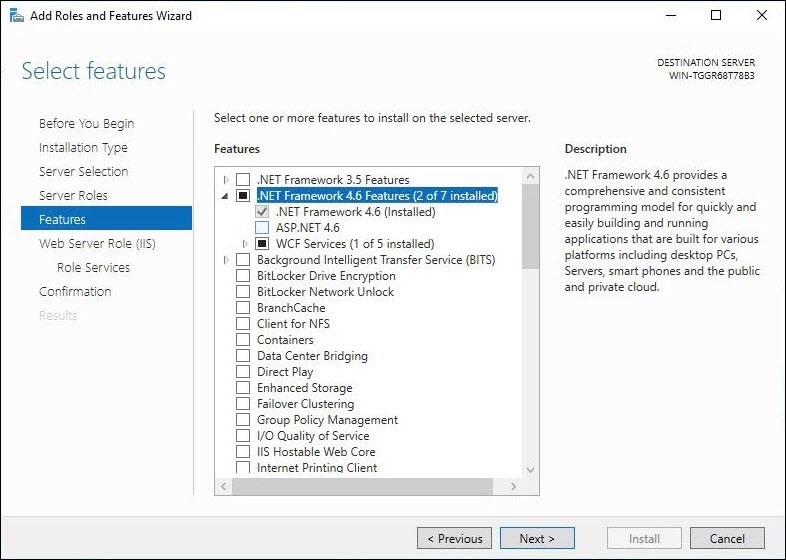
- On the Features section of the wizard add the "ASP.NET 4.6" feature. Expand the .NET Framework 4.6 Features and you will find it just below .NET Framework 4.6.
- On the Web Server Role (IIS) page, Click Next.
- On the Role Services page, all of the options needed should already be selected. Click Next.
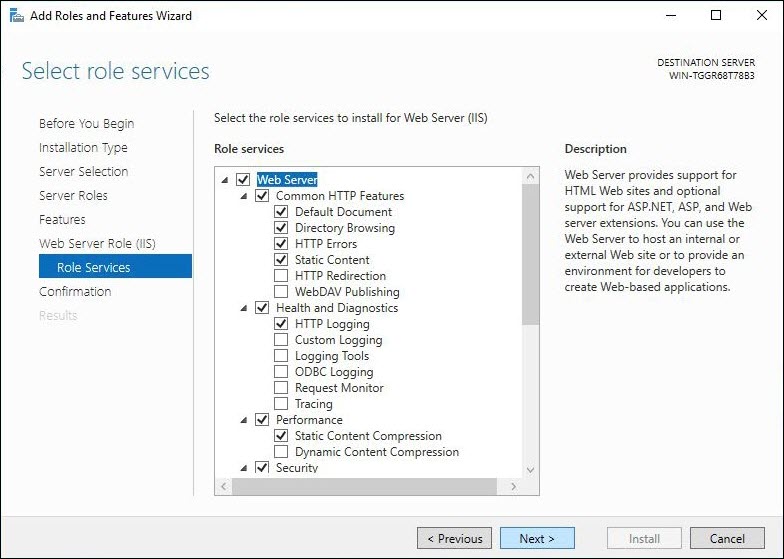
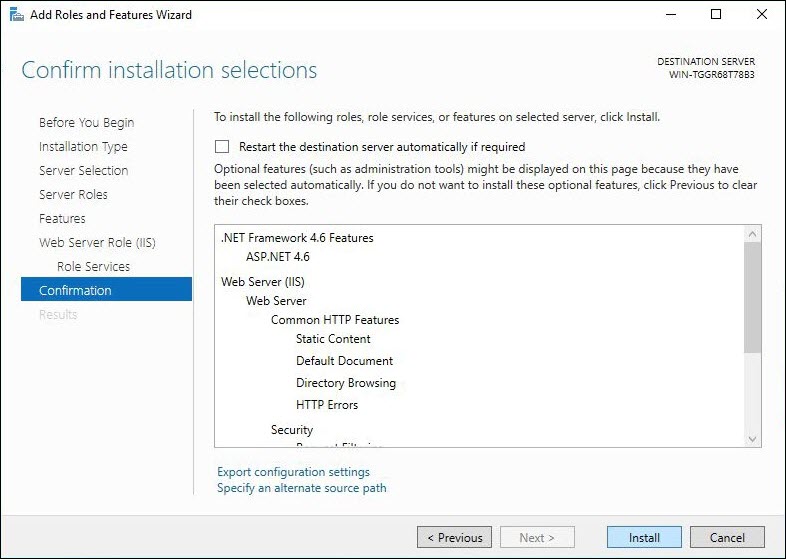
- On the Confirmation page, check that the ASP.NET 4.6 feature and the Web Server (IIS) is included in the list and click Install.
- Wait for the installation process to finish and restart the server afterwards.
Setup SQL Server
- Download SQL Server Express 2016 from Microsoft. Here is the link: https://www.microsoft.com/en-us/sql-server/sql-server-editions-express
- Click the link that says "Try SQL Server 2016 Express for free" to download the setup file and click Run.
- Choose and install SQL Server 2016 SP1 Express with Advanced Services option. Full-Text Search and SQL Server Service Broker are requirements for running AuctionWorx.
Install SQL Server Management Studio (SSMS)
- Download the latest release that is "Production Use" ready. Here is the link: https://msdn.microsoft.com/en-us/library/mt238290.aspx
- Download and install SSMS (SQL Server Management Studio) with the default settings. When the installation is complete restart the server. If there are any updates needed after you reboot the system, install the updates and reboot the server again.
Installing AuctionWorx
- After installing IIS on the server, there should be a folder on the hard drive called C:\Inetpub. Create a folder inside Inetpub called AWE. It should look like this: C:\Inetpub\AWE
Note: You can name the folder whatever you want as long as the settings through out the setup.
- In this newly created folder, copy in the contents of the Web folder from the AuctionWorx package.
- While viewing the Inetpub folder in windows explorer, right click the Inetpub folder and select Properties.

- Select the Security tab from the Inetpub Properties window.
- Click the "Edit..." button.
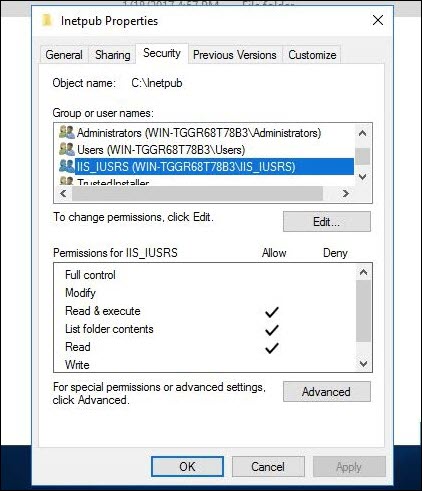
- From the Permissions window, click the Add button to add a new user to the list. Type in "IIS_IUSRS".
- Click Apply and OK.
Note: It is OK to skip past any errors that appear during this process.
- Now that the web root has the appropriate Read / Execute Permissions there are a few more folders that should be given Full Permissions. Allow the IIS_IUSRS to have Full Permissions in the following folders within the web root:
- \Content\images\Logos
- \Content\listingImages
- \Content\images\Banners
- \Content\eventImages
Configuring IIS
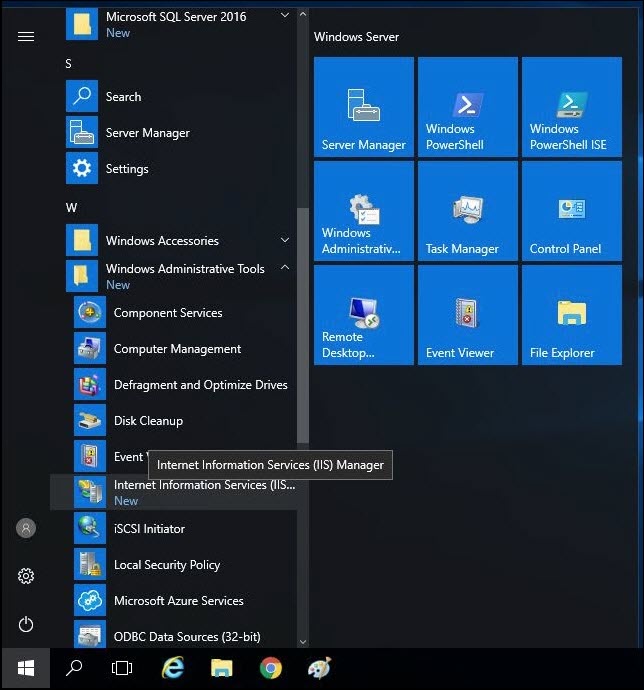
- To open IIS, click Start > Windows Administrative Tools > Internet Information Services Manager.
- Right click the Server in the navigation on the left and select Add Website.
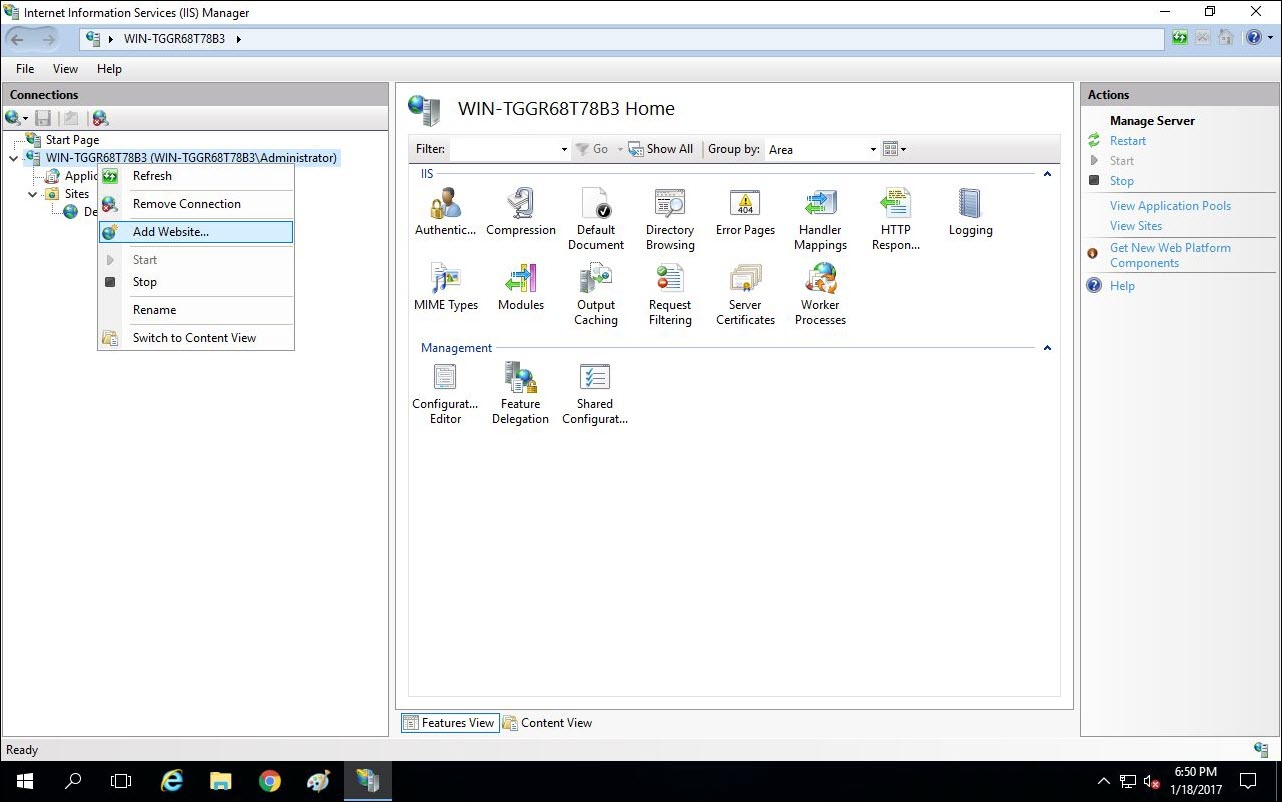
- Give the site a name "AWEexample1", select the Physical path as "C:\Inetpub\AWE" and click OK.
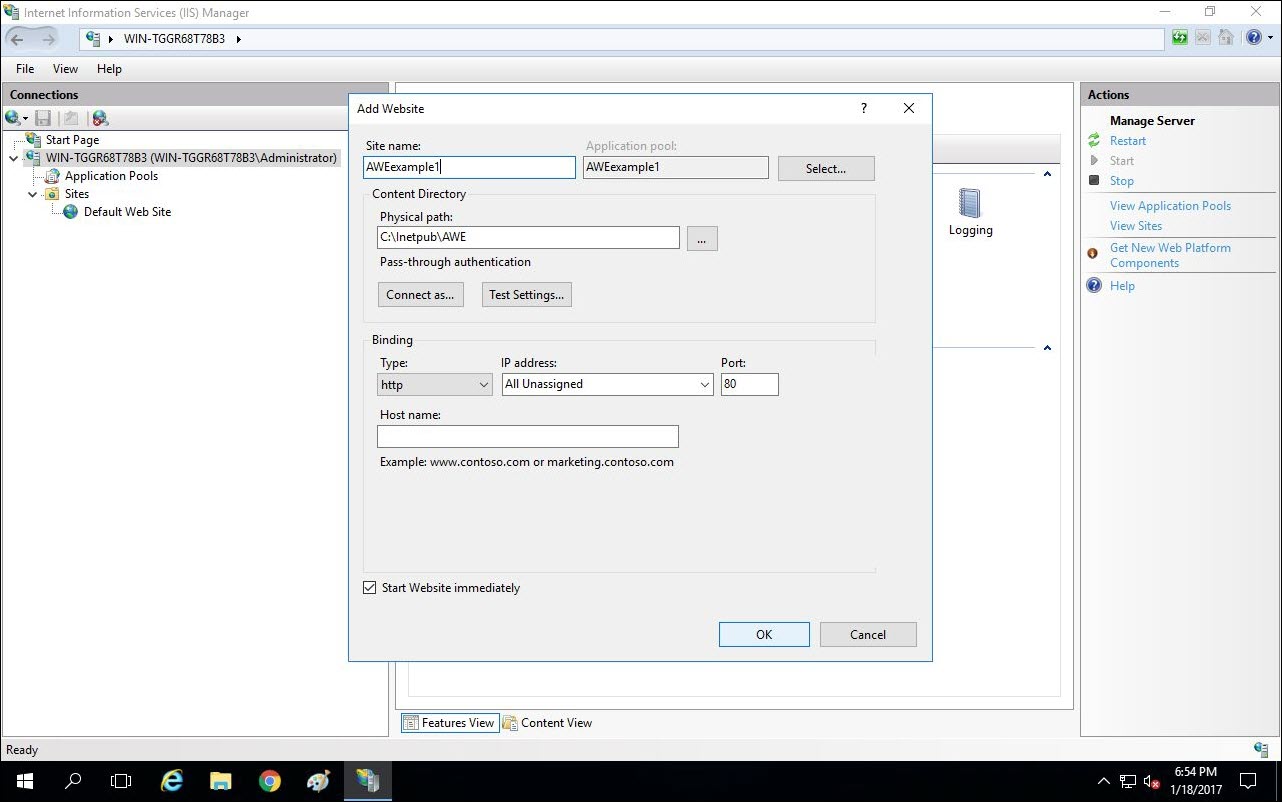
- You should get a message saying something to the effect of "The binding '*:80:' is assigned to another site...". Click yes.
- In the navigation under Sites, it should display both Default Web Site and AWEexample1. Right click the Default Web Site and click Remove.
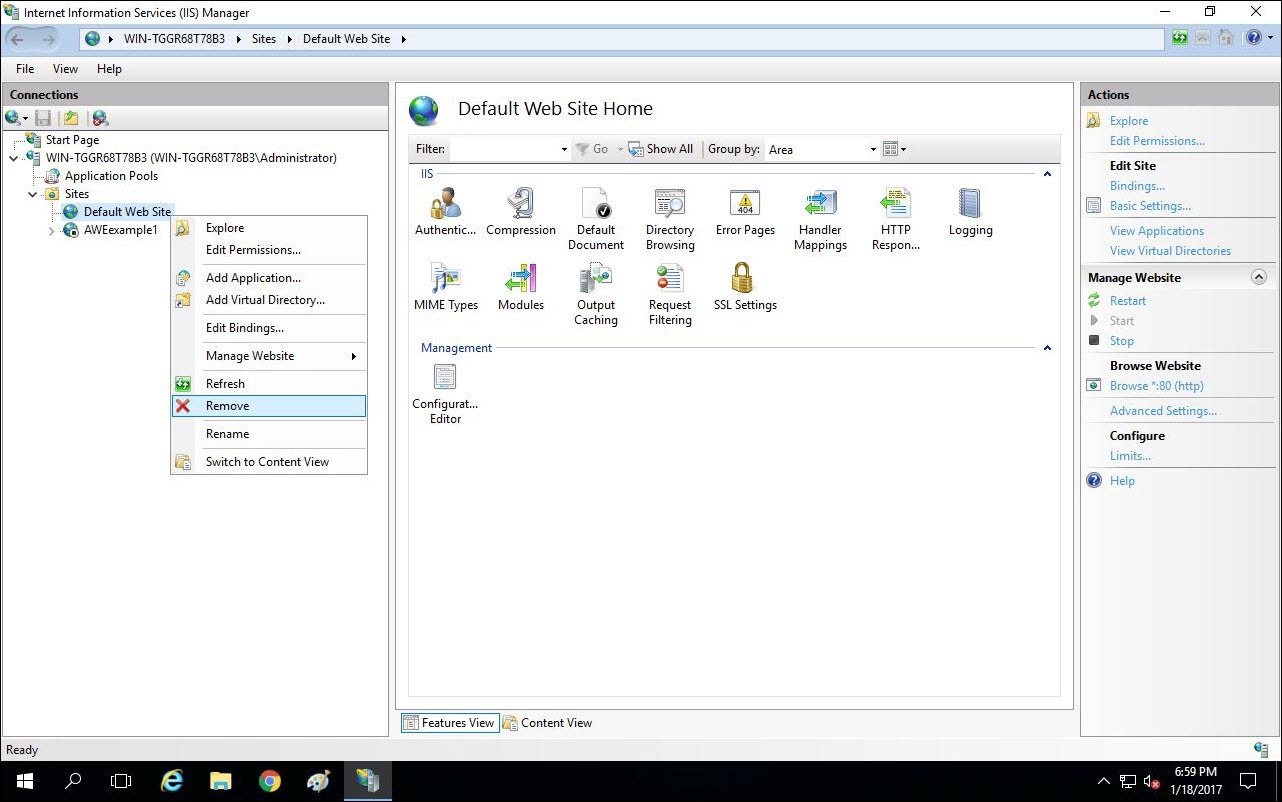
Note: Disabling the Default Web Site is also sufficient.
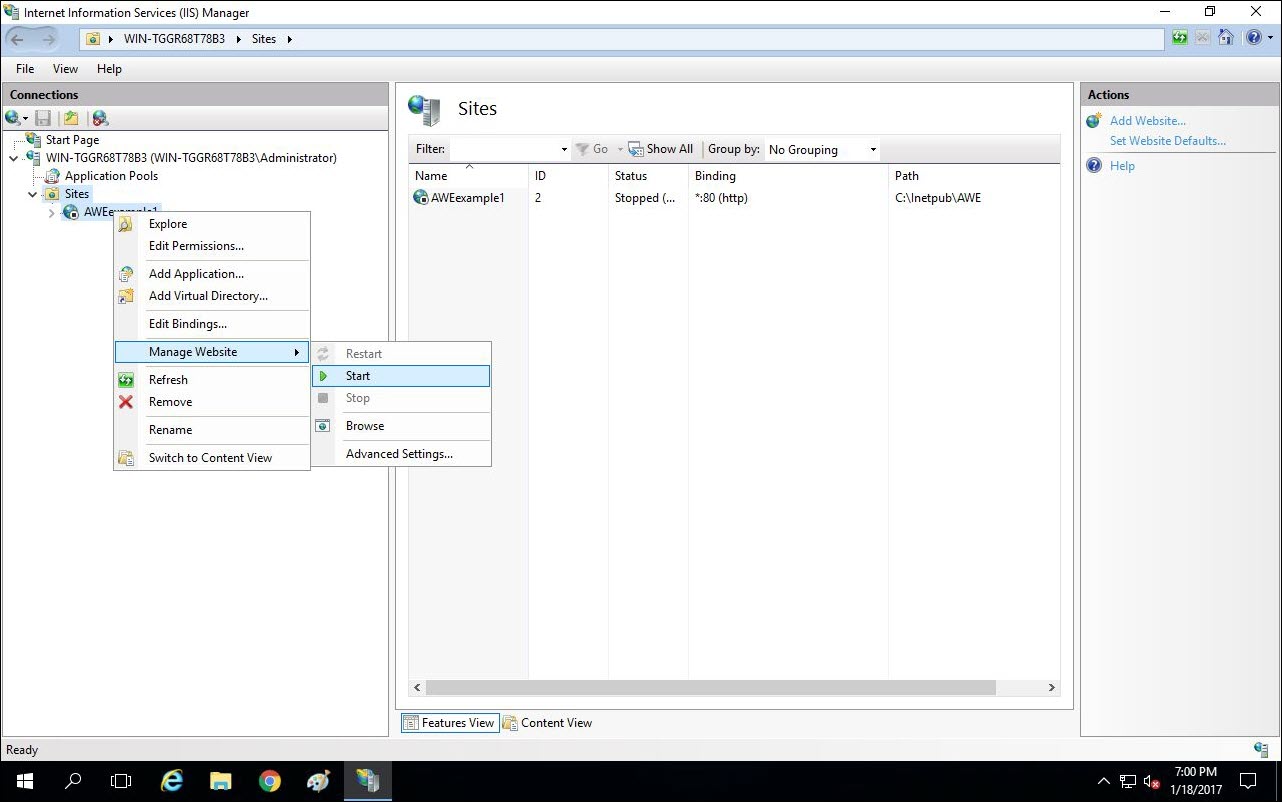
- Right click AWEexample1 and select Manage Website > Start.
- In the navigation under the server, Select Application Pools. A list of Application Pools should be displayed on the right. Right click the DefaultAppPool and select Remove.
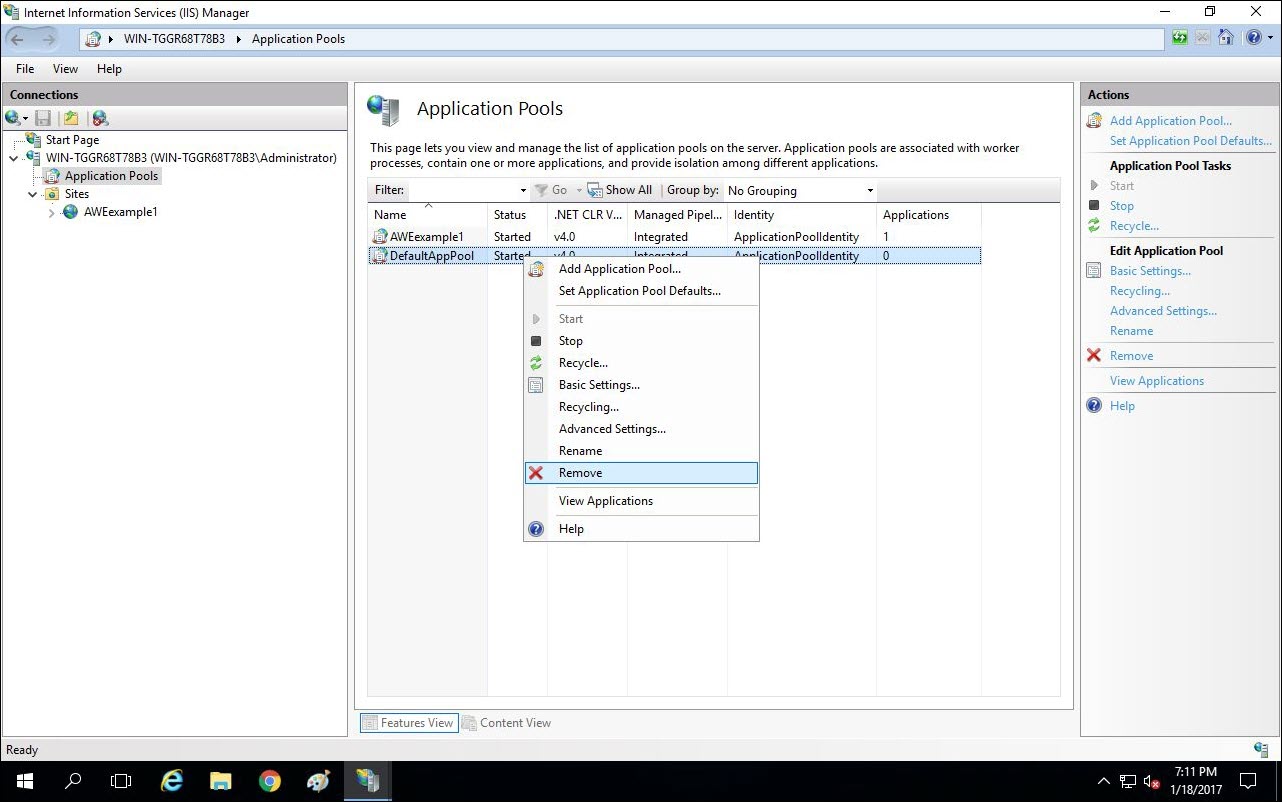
Note: This is optional or you can also just disable the Default App Pool.
Creating the Database and User
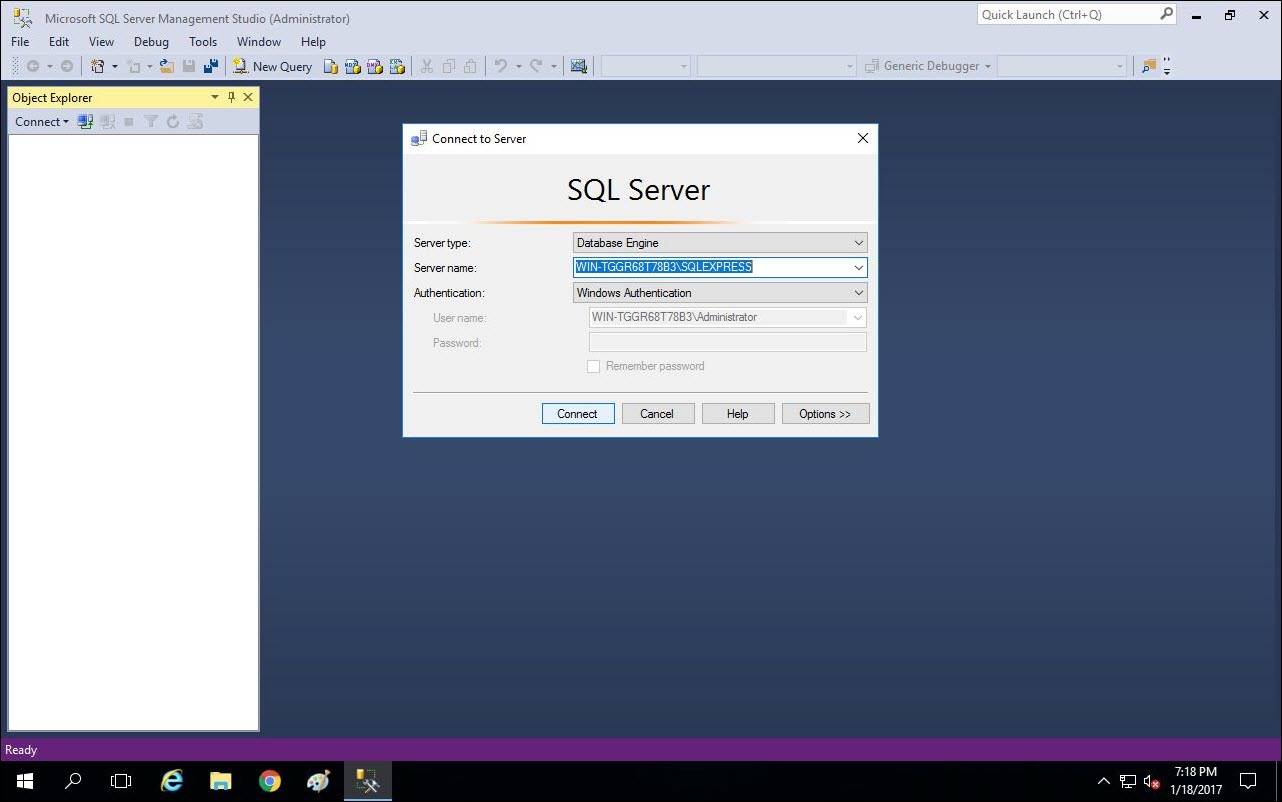
- Open Microsoft SQL Server Management Studio.
- Click Connect.
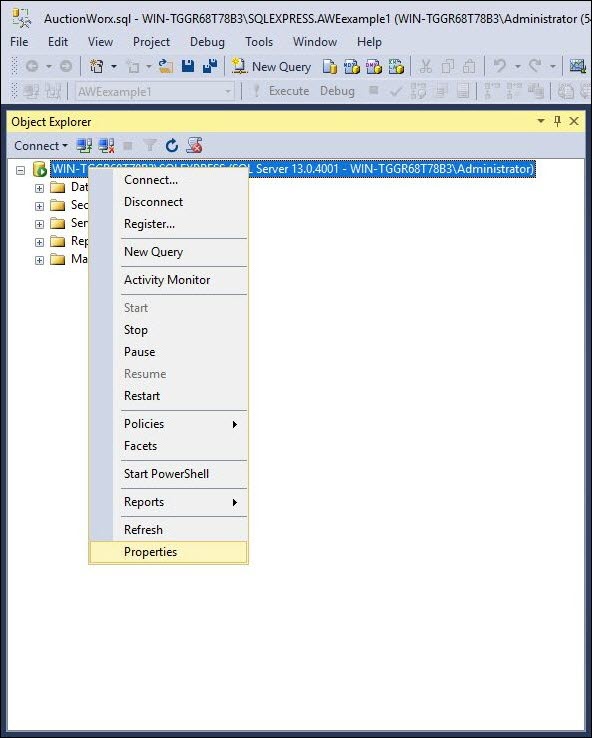
- Before creating the database, the SQL Server needs a change made to server authentication. Right click the server in the navigation on the right and select Properties.
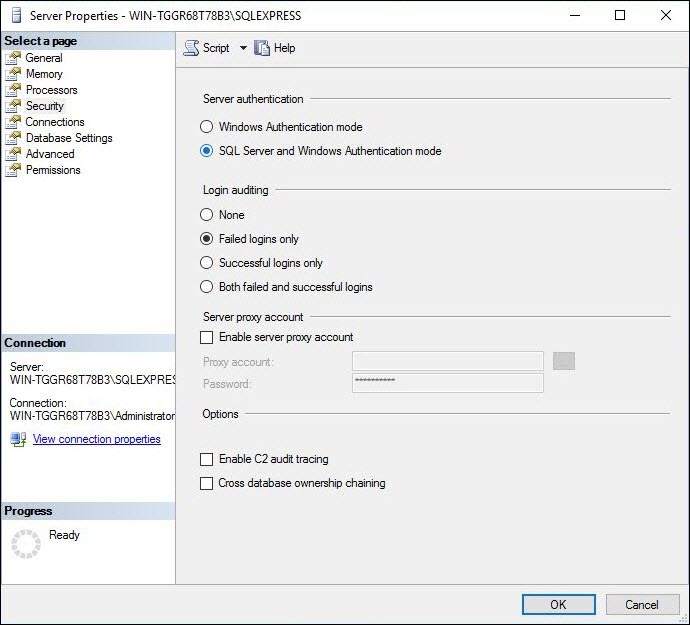
- On the Security page, select "SQL Server and Windows Authentication mode" and click OK.
- Right click Databases and select New Database.
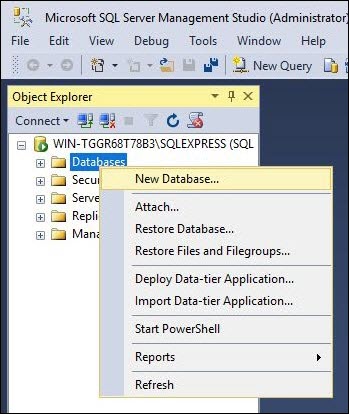
- Name the database "AWEexample1" and click OK.
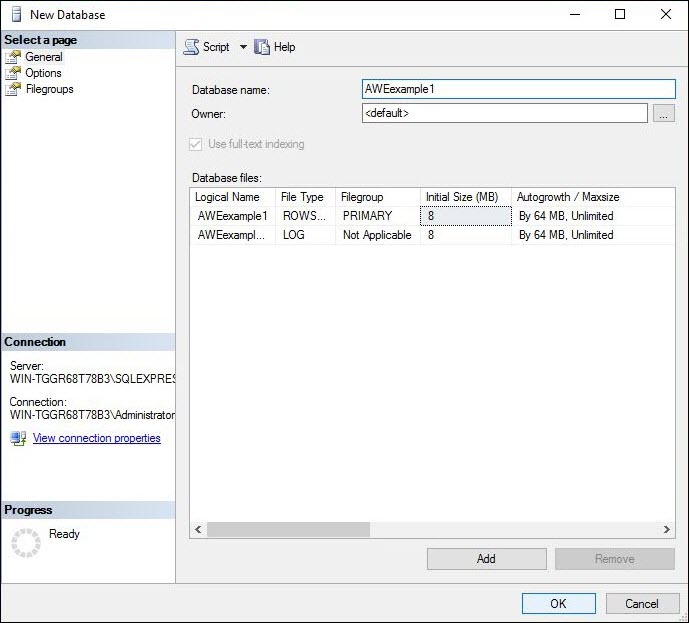
Note: You can name the database whatever you like, as long as you are consistent throughout the process.
- Right click Security and select New > Login.
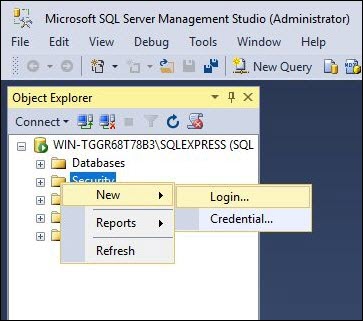
- Type in "AWEexample1" as the Login name, select SQL Server authentication, enter "AWEexample1" as the password, uncheck Enforce password policy.

Note: The password is "AWEexample1" in this example but, you should be using a secure password for the database connection.
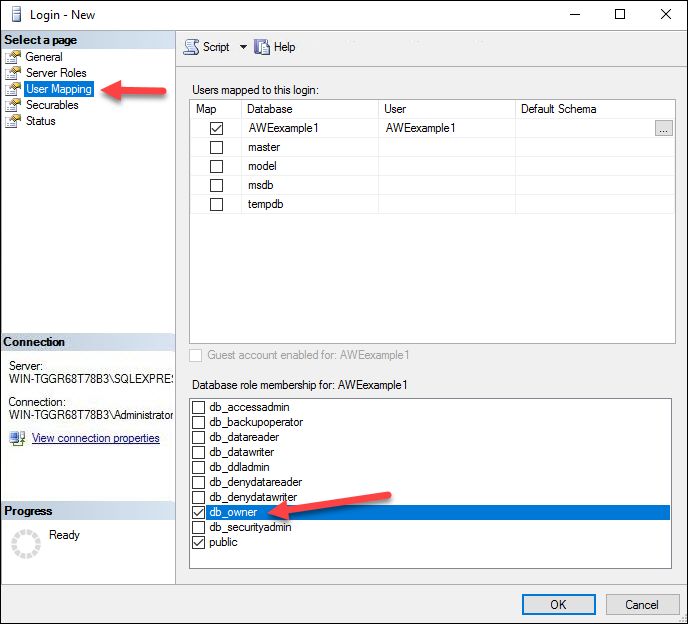
- On the top left side of the new login dialogue, select User Mapping. On this page add "db_owner" to the database role membership for "AWEexample1" , then click OK.
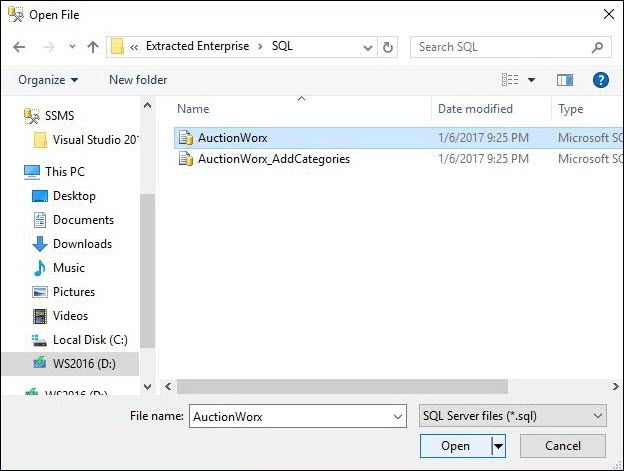
- Expand the Databases folder, select the AWEexample1 database and click File > Open > File.
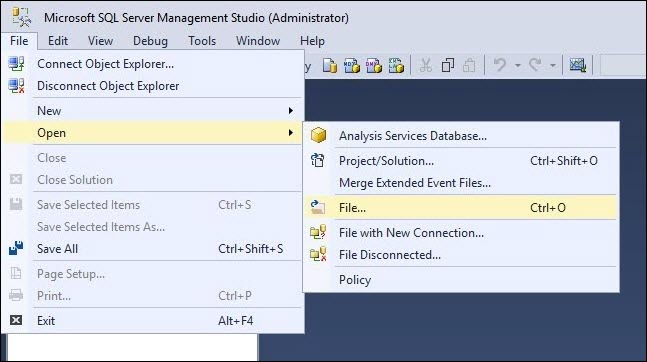
- Open the AuctionWorx.sql file from the SQL folder in the AuctionWorx package you received from RainWorx.
Note: Optionally, the default categories script can be run to add general purpose categories to the site. It will take a while to execute as it optimizes category hierarchies for the 25,000+ categories it contains.
- Be sure that the AWEexample1 database is selected in the toolbar at the top before clicking on the Execute button.
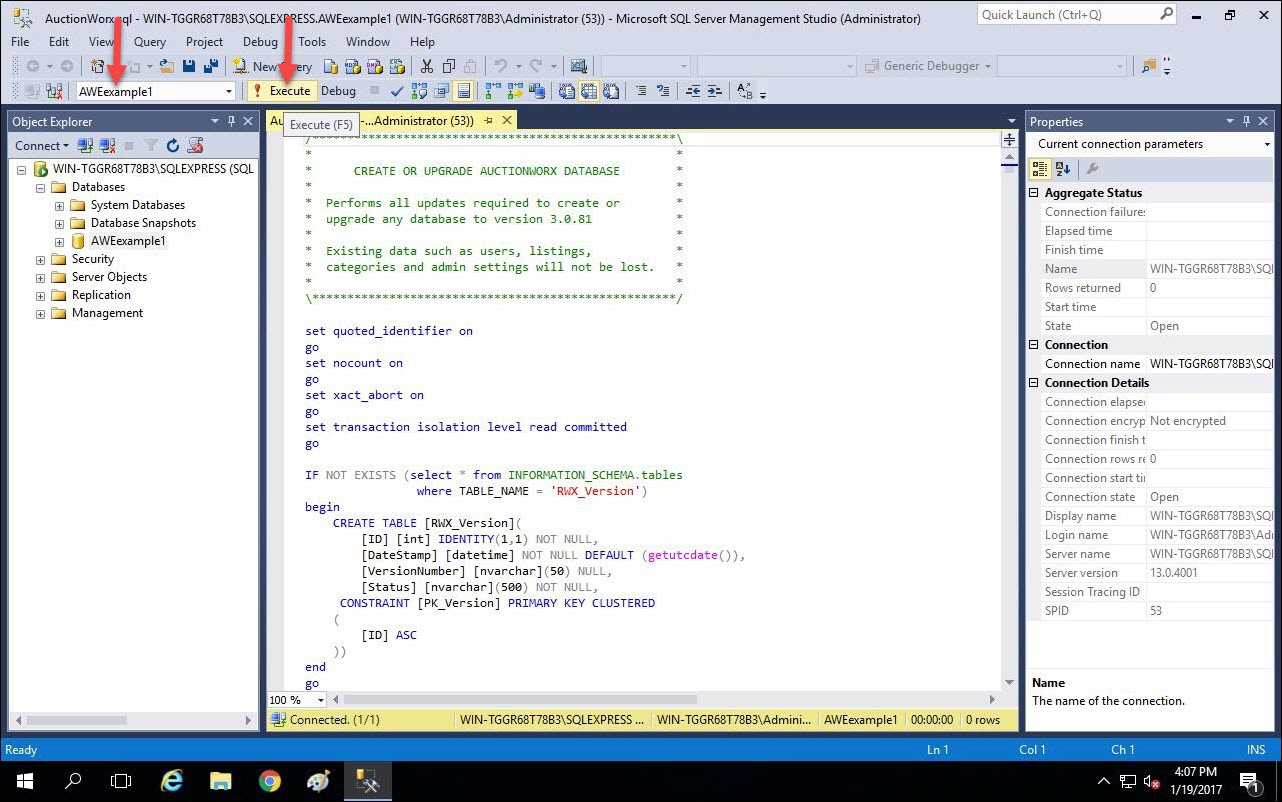
- Once the SQL job is done you can close SQL Server Management Studio.
Configure Connection String
- Open the Web.config file in the AWE folder (C:/Inetpub/AWE/Web.config) by right clicking and open with > Notepad.
- In the Web.config file, find the connection string by scrolling down about a page or so, or use Find by pressing Ctrl + F and then type "Connectionstring".
- In the connection string, for the Data Source value, replace "your server name" with the value found in the connection dialogue when you open SQL Server Management Studio. It should essentially be "Name-of-Server\SQLEXPRESS". For this example it is "WINTGGR68T78B3\SQLEXPRESS".
- Change the Initial Catalog to "AWEexample1" instead of "your db name".
- Change the user to "AWEexample1" instead of "your user name".
- Change the password to "AWEexample1" instead of "your password".
- Save the Web.config file.
Note: "AWEexample1" is meant to be representative of a meaningful username, database name and a secure password.
Example Connection String:
<add name="db_connection" connectionString="
Data Source=WIN-TGGR68T78B3\SQLEXPRESS;
Initial Catalog=AWEexample1;
user=AWEexample1;
password=AWEexample1;"
providerName="" />
At this point, you should be able to type in "http://localhost/" from a browser on your server and the AuctionWorx site should load.
Setup the SMTP Service with SendGrid.com
RainWorx recommends using the service SendGrid.com to new clients that are unsure what SMTP (Simple Mail Transfer Protocol) service to use. SendGrid.com provides a free option for those who are just getting started and are unsure how what level of service will be required.
If you have a different outgoing relay service that can provide you with SMTP settings you can skip this step.
- Go to SendGrid.com.
- Click the Try for Free button.
- Create a new account with the Free 12k $0.00 / mo option.
- Verify your email address.
- Wait for the provisioning process to be completed. This should take 1 or 2 minutes.
- Once provisioning has been completed (You should receive an email saying it has) you can create an API Key. Reload the SendGrid.com page.
- Click Settings > API Keys then click the Create API Key. Choose a General Key.
- Fill out the form. Choose a General Key and give it full permissions for all of the settings.
- Copy the API Key and paste it into your notes.
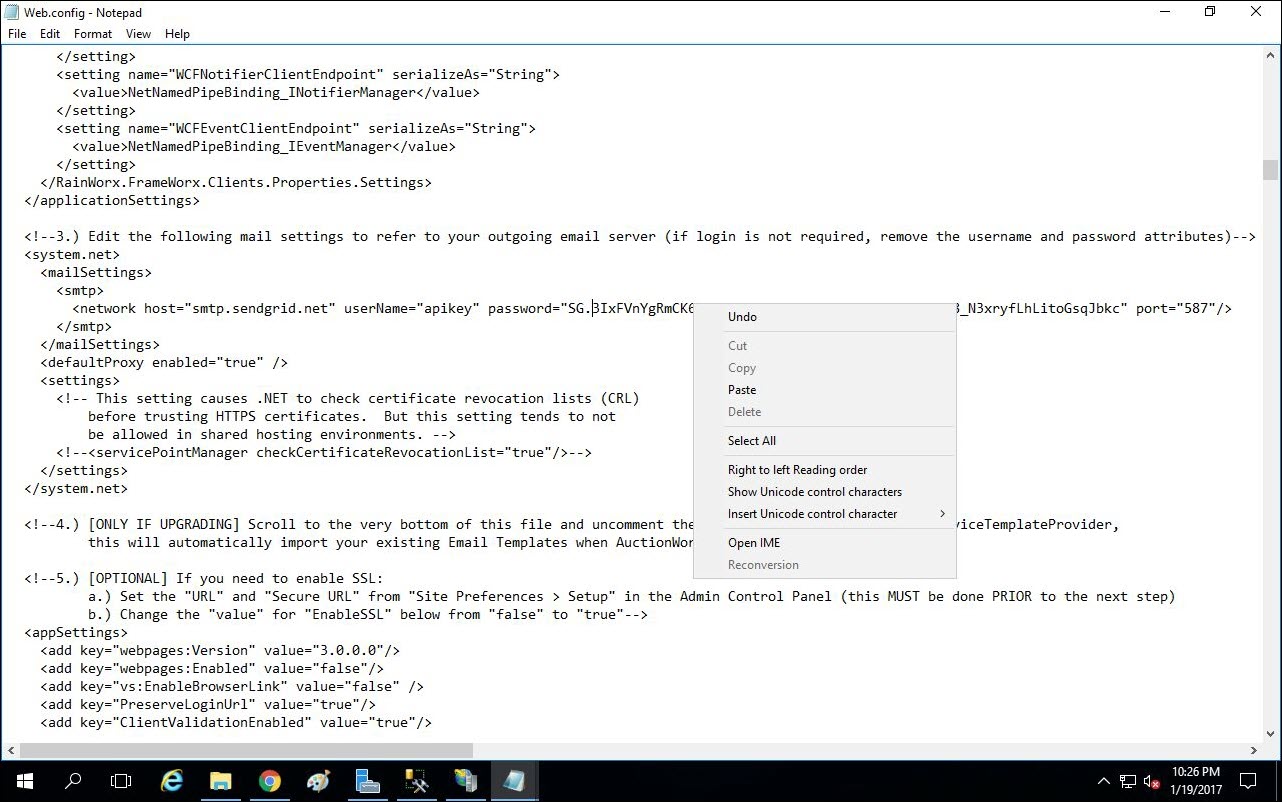
The API Key is used as the Password for the SMTP settings. Host, Username and Port should be the same for anyone using SendGrid.com.
With AuctionWorx, your Settings will look something like this:
Host - smtp.sendgrid.net
Username - apikey
Password - SG.Yk6bdk85RMqXRi543zI4gQ.cFpr3zLPnIQTviWN4uYgusoLvdliq3XY8g...
Port - 587
Configuring the SendGrid.com Service in Web.config
- Open the Web.config in notepad.
- Use the find feature (Ctrl + F) to find "SMTP".
- Enter in the information as stated above and save the file.
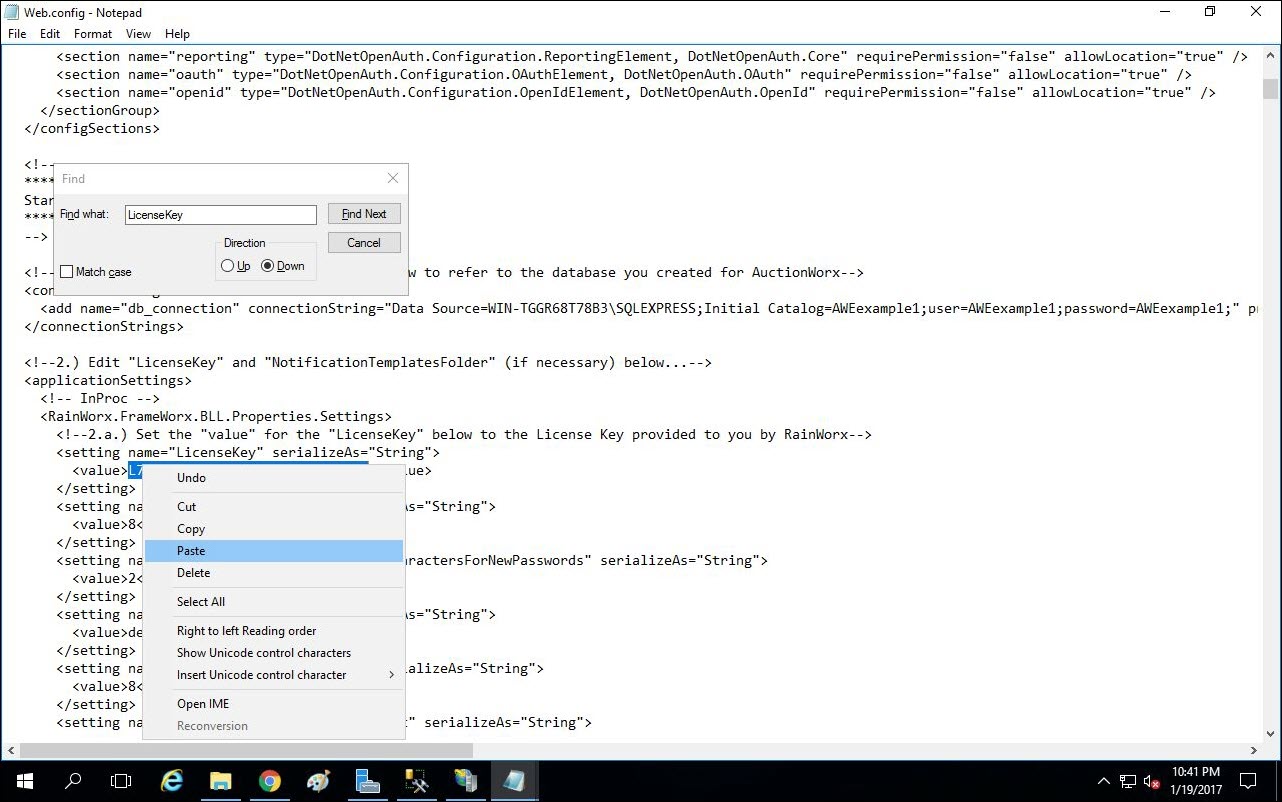
Adding your License Key
- Open the Web.config in notepad.
- Use the find feature (Ctrl + F) to find "LicenseKey".
- Replace "your license key" with the license key you received from RainWorx Software with your purchase.
Testing your Deployment
- Enter in "http://localhost/" from a browser on your server and the AuctionWorx site should load.
If your web app now loads you have correctly configured your database connection strings.
- Login in as the admin and change the contact information.
- Navigate to Site Preferences > Contact and change the "Administrator Email" and "System Email Address" to an email address you have access to. Click Save.
- Navigate to Site Preferences > Setup and change "URL" and "Secure URL" to "http://localhost". Be sure leave out the slash at the end of the URL. Click Save.
- Sign out and create a new user with the "Register Now" link found on the Sign In page.
- Fill in the form with Test User type information and make sure that the email address is one that you have access to. You will want to receive any messages from the system to confirm that the SMPT outgoing relay is working correctly.
Once you click "Complete Registration", if you see a verification email in your inbox, that means that your SMTP settings are correctly configured.
- Signed in as the admin still click Sell.
- Select a category and Auction and click Next.
- Enter a simple Title, simple Description, a Starting Bid of $100, a Duration of 3 days and click Create Listing.
If you see a Listing Confirmation page that says "Congratulations!" then your license key settings are correctly configured.
- Go back to the verification email in your inbox. Click the link provided to finish the verification process and sign in as the new user.
- Once signed in, locate the listing that the admin user just created. It should be displayed in the category that you listed it under. Open the listing details page.
- Type in a bid of $200.00 and click Submit Bid.
If you see a message that says "You are currently winning this item!" then SignalR and asynchronous bidding are correctly configured.
- Enter in "http://localhost/admin/checksite" from a browser on your server and the Check Site page should load with a series of tests. These tests should all say "PASS".
Beyond the Initial Setup
There are a few other things that should be mentioned that are not required to get the application running but are worth mentioning.
robots.txt
Edit the robots.txt file located in your Web Root, un-comment the last line, and replace [YourDomainName] with the correct value.
Example: Sitemap: http://www.MyAuctionSite.com/sitemap.xml
Using SSL
It is recommended that you use an SSL certificate to encrypt communications on sensitive pages of your installation. After you've installed an appropriate SSL certificate, perform the following steps:
- Login to the site as an administrator and access the "Admin Control Panel."
- Under "Site Preferences / Setup," set the "URL" and "Secure URL" properties appropriately.
- Set the "EnableSSL" setting in the web.config file to "true". Once you do this, the above URL settings will be enforced.
Note: Only set “EnableSSL” to “true” after you have set the “URL” and “Secure URL” properties from step 2 properly or you may not be able to access the site.
Optional Database Maintenance
It is recommended that you perform regular maintenance on your database to optimize performance.
Included with AuctionWorx is an “RWX_ADM_OptimizeDatabase” stored procedure that you can run on demand or schedule as a SQL job. This procedure is minimal in that it will rebuild all indexes, update all statistics, and update usages (regardless of whether a rebuild/update is necessary).
While this stored procedure is executing, tables will be locked, so it should be run during periods of least activity. If your workflow cannot tolerate table locks at any time, please consult your database administrator for an alternate solution.
Note: “RWX_ADM_OptimizeDatabase” can do the job but there are better Database Optimizing Scripts available from third parties that for example, only optimise the indexes that require optimization rather than every index each time. At minimum there should be a plan in place for managing the database.