Azure Installation
An Azure deployment consists of the standard MVC project, with an Azure specific web.config file, a WorkerRole project which houses the execution of the Scheduler’s threads, and an Azure project which packages both the MVC project (web role) with the Worker Role project for deployment to Azure.
Please download the latest Azure package which contains a solution of these three projects with the appropriate web.config file.
Create SQL Azure Database
Note: Azure SQL Database V12 is required.
- To create a SQL Azure database, click on “SQL Databases” and then click “+ NEW”


- Click on “Custom Create”

- Enter a “Name” for your database
- Choose an appropriate Edition and Size
- Choose “New SQL database server”
- Click the “Next” Arrow

- Choose a “Login Name.”
- Choose a “Password.” Make note of this for future reference.
- Choose an appropriate “Region.”
- Ensure “Allow Windows Azure Services to Access the Server.” is enabled.
- Click the “Check Mark”

- Wait for the process to complete.
- Select your newly created database.

- Click “View SQL Database connection strings for ADO .Net, ODBC, PHP, and JDBC”

- Save the ADO.NET connection string, replacing “your_password_here” with the password you provided when you created the database, for future reference.
- To allow you to connect to, and manage, your Azure SQL database from your local machine, click the “firewall rules” link.

- Azure will display your current Internet IP address. Click “Add to the allowed IP addresses.”
- Click “Save”
- Connect to your SQL Azure database with SQL Server Management Studio, using the hostname and User ID from the generated connection string, and the Password you provided when you created the database.
- Execute the “AuctionWorx.sql” SQL script against your Azure database. (Note, since Azure does not support Full Text Indexing at the time of this writing, expect to see three errors related to Full Text Indexing. These errors have been accounted for, so if you only see these three errors, your database is still properly setup.)
- Execute the following SQL commands (or execute the included AuctionWorx_Azure.sql SQL Script):
update RWX_Attributes set Value = 'BlobStorage' where Value in ('DirectFileSystem', 'DateHashedFileSystem')
update RWX_Attributes set Value = 'BlobStorageURI' where Value in ('DirectURI', 'DateHashedURI')
Create SQL Storage Account
- To create a Storage Account, click on “Storage” and then click “+ NEW”
-
Click on “Quick Create”
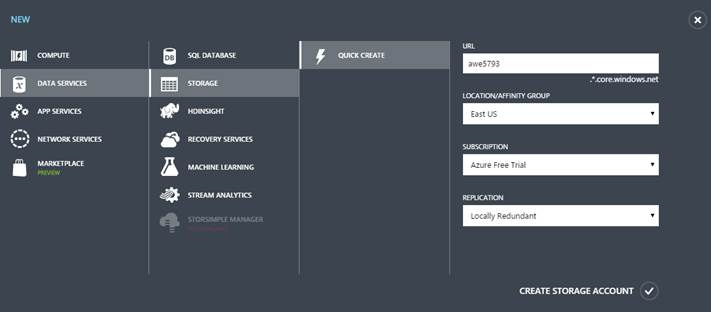
- Enter your desired “URL”, select options from remaining dropdowns, and then click “Create Storage Account”
-
Select the new Storage account and click on “Manage Access Keys”
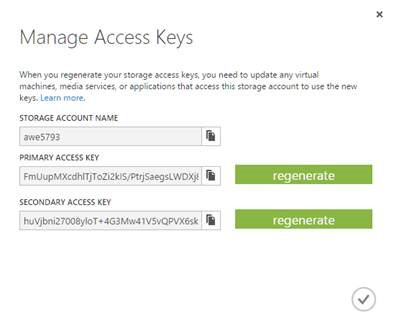
- You will need the storage account name and the primary access key for the next section to create the azure package for deployment.
Note: It is recommended to use a third party SMTP service such as sendgrid.com
Create Azure Package
To create an Azure Package for deployment, perform the following:
- Open the Azure Solution
- In RainWorx.FrameWorx.Azure\ServiceConfiguration.Cloud.cscfg; set the storage account connection string (the value) two places for "Microsoft.WindowsAzure.Plugins.Diagnostics.ConnectionString" and two places for "RainWorx.FrameWorx.Providers.Media.Azure" resulting in 4 total replacements. Using the “Storage Account Name” and the “Primary Access Key” noted above: format your connection string as follows:
DefaultEndpointsProtocol=http;AccountName={Your Storage Account Name};AccountKey={Your Storage Account Primary Access Key}
Note: if you enable SSL, you might want to set the "DefaultEndpointsProtocol" to "https"
Here's an example connection string:
DefaultEndpointsProtocol=http;AccountName=mystorageaccount;AccountKey=gfR7gSFDdfg3SDFDFGtgjryTYUFGtr45DFGSDFd34dfgDFGGDF==
- In RainWorx.FrameWorx.Azure.WorkerRole\app.config; set the connection string with the ADO.NET connection string noted above.
- Also in RainWorx.FrameWorx.Azure.WorkerRole\app.config; set your specific Mail Server information in this section:
<system.net>
<mailSettings>
<smtp>
<network host="yoursmtpserver" userName="username" password="secret"/>
</smtp>
</mailSettings>
</system.net>
- Also in RainWorx.FrameWorx.Azure.WorkerRole\app.config; set your license key in this section:
<setting name="LicenseKey" serializeAs="String">
<value>your license key</value>
</setting>
- In RainWorx.FrameWorx.MVC\web.config; set the connection string with the ADO.NET connection string noted above.
- Also in RainWorx.FrameWorx.MVC\web.config; set your specific Mail Server information in this section:
<system.net>
<mailSettings>
<smtp>
<network host="yoursmtpserver" userName="username" password="secret"/>
</smtp>
</mailSettings>
</system.net>
- Also in RainWorx.FrameWorx.MVC\web.config; set your license key in this section:
<setting name="LicenseKey" serializeAs="String">
<value>your license key</value>
</setting>
- Right click on the RainWorx.FrameWorx.Azure project and click “Package”
- Keep the default values (Service Configuration: Cloud & Build Configuration: Release) and click “Package”
- When the packaging process is complete, two files will be generated; RainWorx.FrameWorx.Azure.cspkg and ServiceConfiguration.cscfg. Make note of the location of these files for deployment.
Create Azure Cloud Service and Deploy Package
- To create an Azure cloud service, click on “Cloud Services” and then click “Create a Cloud Service”

- Click on “Custom Create”


- Type in the name for your new URL and choose an appropriate “Region of Affinity Group.”
- Check “Deploy a cloud service package”
- Click the “Next” Arrow

- Type in a Deployment Name
- Choose the “Package” and “Configuration” files “From Local” (which you generated in a previous step)
- Select “Staging” for “Environment”
- Check “Deploy even if one or more roles contains a single instance.”
- Click the “Check Mark”

- Wait for the process to complete
- Select the “Cloud Service” you just created
- Click “Dashboard”

- To test your AuctionWorx Azure installation, browse to the URL indicated by “Site URL” from the “Dashboard”
Viewing Azure Errors
- Download and run “Azure Storage Explorer (ASE)” (or other similar tool) from http://azurestorageexplorer.codeplex.com/
- Add the appropriate storage account

- Click “Tables” under “Storage Type”
- Click “WADLogsTable” in the far left
- Click the “Query” button
Azure specific errors and informational messages will appear