Edit
This section is used to add, edit or delete listing categories.
The category hierarchy is not limited to a fixed depth. It can be as detailed as required for your market. Listing Types and Custom Listing Fields can optionally be assigned only to certain listing categories. The search system will query listings utilizing these custom fields. Listing types can only be assigned and unassigned from leaf level categories (categories without sub-categories).
Examples: Any number of Custom Listing Fields may be defined for one or more categories.
A Real Estate listing may contain custom fields for : Square feet, Number of Bedrooms or Year Built.
A Vehicle listing may contain custom fields for : VIN number or Mileage.
A Clothing listing may contain custom fields for : Size or Condition.
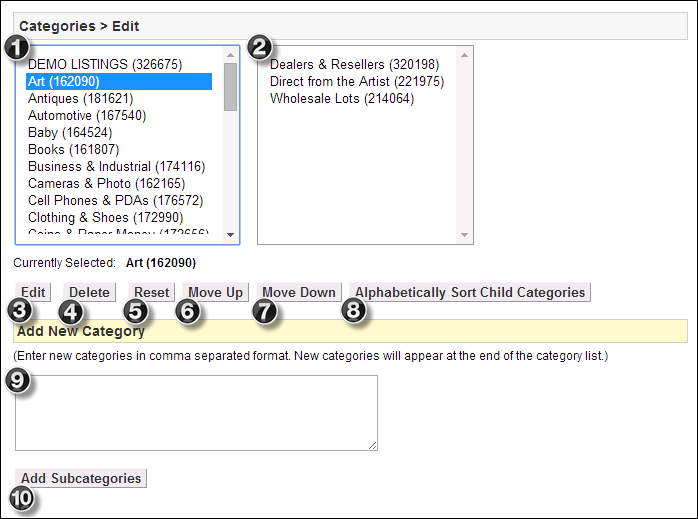
- Top Level Categories - This is where existing Top Level Categories will be displayed. Use this box to select categories for further action.
- Child Categories - Like the Top Level Category box, this box provides a place to view the Subcategories or Child Categories. Subsequent child categories will be displayed in boxes to the right and below.
- Edit - After selecting a category, click this button to access a more detailed edit page for that specific category. This will open the Edit Category Detail page.
- Delete - After selecting a category, click this button to delete the category and any subcategories connected to it.
- Reset - Click this button to unselect any categories and return to viewing only the Top Level Categories.
- Move Up - After selecting a category, click this button to move the category up in the display order.
- Move Down - After selecting a category, click this button to move the category up in the display order.
- Alphabetically Sort Child Categories - After selecting a category, click this button to alphabetically order the subcategories of the next tier. To alphabetically sort the Top Level Categories, click the Reset button first.
- New Category Text Box - Enter one or more new categories into this text box in CSV format (Comma Separated Values) to add categories to the site. Select a category above to add subcategories to it.
- Add Subcategories - Click this button to submit any categories entered into the New Category Text Box. The new categories will be added to the bottom of the list by default.
To edit Categories
- Select the category you want to edit and click "Edit".
- Fill out the new category information on the Edit Category Detail page.
To delete or reset Categories
- Select the category you wish to delete.
- Click "Delete".
To add new Categories
- Under "Categories" in "Edit" select the parent category of the list you wish to add a subcategory to.
- Enter new categories in the "Add New Category" field in comma separated format.
- Click the "Add Subcategories" tab.
- New categories will appear at the end of the "Category List".
Note: When making changes to child categories, the same setting will apply as was applied to the parent setting. After the listing is made however, changes will not be inherited when the category is edited.